| or on PC via Steam or itch.io |
updated: 17 April 2026 (see changelog)
✈ For users without any knowledge of ATC, there's a short beginner's guide.
✈ To add your own airports to the game, read here about Custom Airports.
✈ The free version of the android app, Endless ATC Lite, is available here.
Below are full instructions for the simulation game Endless ATC:
 |
| Top view and side view of a correct ILS approach. In this example, a plane at 2000 feet approaches runway 27 at a shallow angle of about 30 degrees. If ILS mode is enabled, the plane will capture the blue ILS path automatically, and land. Note that the altitude of the plane determines the required distance from the runway: the higher the plane is, the further away it needs to be from the runway. The blue circles indicate the required distance; make sure to intercept the glideslope 'from below'. |
 | |
|
.png) |
| Aircraft labels, runways, and the ILS |
 |
 |
- Sequence the randomly generated arrivals to the ILS (Instrument Landing System) of a landing runway. The runway is the thick blue line in the middle of the radar screen, and the ILS path is the thin blue line extending from the runway. Guide the planes to this blue line, far enough from the runway. In order to capture this ILS beam and land, a plane must comply to these conditions:
- the ILS mode of the plane is activated,
- the plane intercepts the ILS line at a shallow heading of 60 degrees or less with respect to the runway heading (in reality they use 30 degrees or less),
- the plane has to be descended low enough to intercept the glideslope; the blue circles mark the altitudes of 2000, 3000 and 4000 feet.
- When a plane is established on the ILS, it will be handed over the tower and then you score some skill points. The amount of skill points you score per plane depends on your current skill score. You always get at least 0.1 skill points per plane handed over to the tower. The skill score represents how well you are managing the airspace and it also determines the number of planes you will have to control simultaneously, so a score of 8.4 will give you about 8 planes to control.
- If a plane is too high on the ILS (flying above the glideslope) it will eventually call 'missed approach'. ILS mode is then deactivated. Try a new line-up at a lower altitude, so it will capture the glideslope from below. If a plane is about to land on a runway that is still occupied by another plane, it will go around: it climbs to 2000 feet and ILS mode is deactivated. Give it new vectors to the ILS, now with more distance behind the leading plane.
- At the top left you see your current game score. This number is the maximum of what your skill value has been in the current game. So your score can only increase. Then there's also the high score: the highest game score you ever reached on your device (unless you cleared the app data).
- Departing aircraft determine their heading and speed themselves; they only require an instruction to climb to a higher altitude. This can be done, when it's safe, by just one click to select FL130. Other altitudes can be selected but keep in mind that eventually the plane has to continue the climb to FL130. Optionally, a heading can be given by disabling 'SID' mode temporary. When you disable SID, the climb altitude is also restricted to FL90. Make sure to activate SID mode at some point again and continue the climb so that the plane has climbed above FL90 before passing the boundary of the airspace. The airspace boundary is displayed as the outer circle (radius 30 NM, 30 nautical miles). For New York, departing planes fly on a heading initially, so you'll have to manually enable SID to clear planes to the departure fix.
- You can lose skill points when planes:
- fly too close to eachother (in general: overlapping circles and altitude difference less than 1000 feet),
- divert (leave the airspace at the 30 NM boundary), also if they are departures but fly at or below FL90 when leaving the airspace,
- abort the approach (runway occupied, too high altitude etc.),
- are delayed (not landed within about 30 minutes)
- An aircraft label has the following lines of info:
- callsign,
- current altitude and selected altitude (in feet divided by 100),
- ground speed (in knots), weight category (Light, medium [no tag], Heavy or Super J), mode (ils/direct/hold).
- destination (only if other than main airport)
- When a plane is not in your control, it has a smaller label of just two lines.
- When a plane wants your attention, it has a flashing blue ring, until you select it.
- You don't have to hand off (or hand on) planes from/to the tower or other controllers. To keep things simple, planes do this automatically. Handoffs are possible, but not necessary.
- You can drag from an aircraft to easily set its heading. When you then drag onto a beacon (grey circle) then the plane flies directly to that point and the DCT button illuminates. Directs can also be given by pressing the 'DCT' button: then it will snap to a beacon/VOR/locator closest to the selected heading. DCT is, like ILS, a mode that alters the heading of a plane automatically. If a plane reaches a beacon without further instructions, it will fly circles above it, in a holding pattern. It's best to avoid holding planes because it will cause delays and crowds the airspace. Longpressing DCT will 'HOLD' the plane at its current position. Some runways have a beacon (a locator) on the ILS path; planes can fly direct to it but won't enter a holding there, but continue ahead. You can also drag from a selected VOR beacon to set a heading on which the plane must fly after reaching the beacon. Departures fly to a randomly chosen beacon and then continue ahead.
- In some cases, the separation minima (1000ft/3NM) are reduced: planes may fly closer to each other when:
- both planes are on a different ILS localizer ('LOC' status), so independent parallel approaches are possible,
- one or both planes are under the minimum altitude (1600 feet),
- two departures are on a divergent heading of 15 degrees or more,
- just after a go-around you'll get a short amount of time to regain a safe separation.
- In general, don't let the 3 NM rings overlap when the altitude difference is less than 1000 feet.
- For parallel approaches, maintain a vertical separation of at least 1000 feet until both aircraft are established on the localizer. For example, join the localizer at 2000 feet for one runway, and 3000' for the other. When the planes then descend to the runway, rule 1 (as stated above) applies so no penalties are given, even if the rings overlap!
- Longpress ILS to enable the ILS* mode, which means the plane will cross one localizer and intercept the next one. This can come handy when parallel runways are in use and you want to guide some traffic to the other runway for better traffic distribution.
- The number of planes you have to control is about the same number as the skill level. When the score increases above certain levels, more runways become active.
- Planes with 'RD' in their label (4th line) need to land on the secondary airport which has only one runway (this runway also has RD in the name, actually meaning EHRD or Rotterdam Airport). Regular planes, so without the 'RD' tag, may not land on this destination but have to land on the main airport Amsterdam Schiphol. Landing on runway 06RD (the opposite direction) is not accounted for in the game (too close to the boundary), so only traffic via the northwest from/to RD is simulated. Note that the amount of traffic to RD is very low compared to the main airport. For London, the traffic rate to the alternate destinations (Gatwick, Luton and City) is a bit higher. If the airspace has altitude restricted areas, for example 30/RD, then planes must be at 3000 feet or above, with the exception of planes with an RD tag.
- The speed displayed at a plane's label is the ground speed, which is usually higher than the selected speed (indicated airspeed, IAS): it has an offset increasing with the altitude (due to air pressure). When you change the speed, the label temporary shows the new target IAS airspeed instead, in yellow.
- If there is wind enabled, the wind speed increases with altitude. It will also affect track heading and groundspeed.
- Expedite a plane's climb/descent (that is: increase its vertical speed) by doubleclicking on the altitude button when it's at its limit value.
- There are light (L), medium (no tag), heavy (H) and superheavy (J) weight planes. The heavy ones turn and climb/descend a bit slower, while their final approach speed is a bit higher.
- Due to wake turbulence, planes behind heavy planes need more distance than the general 3 NM circle. In this sim, wake turbulence separation only applies to planes on the localizer. The required distance depends on the plane category: if a medium plane flies behind a heavy, more distance is needed. There are 6 wake turbulence categories ('RECAT'), and an arc behind the plane will display the required safe distance to the trailing aircraft. If this limit is infringed by more than a mile, you risk a go-around.
- Planes are generated randomly, depending on the skill value you achieve. Runway usage is also randomly chosen at the beginning of a new game. Starting a new game resets the traffic but your high score and goals are saved. In the full version, you can start a new game by selecting the current airport.
- Planes below 3000 feet have the option to descend as low as 1600 feet to make shorter finals possible.
- Planes flying within a 15 nm circle from the field slow down to 220 knots (unless a speed instruction has been given earlier, in which case that speed is maintained till the localizer).
- Planes intercepting the ILS reduce to 200 knots. At 6 miles from the runway they reduce further to 160KT. And at 4 miles, they reduce to final approach speed. You can always reduce earlier if needed.
- Planes handed over to the tower may reduce speed further automatically, but only within 10 miles from touchdown while flying too close to a preceding plane.
- Departures increase their speed automatically unless the speed is set manually.
- Changes to an airplane are applied when pressing the OK button, or when the plane is deselected. Pressing the C button cancels the current changes, and pressing C again deselects the plane.
- There are 3 ways to play the game: normal, custom or scenario. In the 'traffic' menu you can choose one of them. By default, 'normal' mode is enabled.
- In scenario mode, your task is the guide (non-random) traffic to the runways without any mistakes, and sometimes also within a certain time-limit. See the traffic menu at EHAM to start the first scenario. When succeeding that challenge, the next scenario will be unlocked.
- By enabling custom traffic mode, the skill value can be either fixed to a certain level, or capped so won't increase too much while playing. This is a way to change the difficulty of the game, because the number of planes you have to control is equal to the skill value. This allows for a more relaxed gameplay, or allows you to keep the amount of traffic at a more realistic level. If you lower the skill below 4.0 then the airspace will be closed entirely. Closing the airspace is also possible by pressing the 'end game' button in the traffic menu.
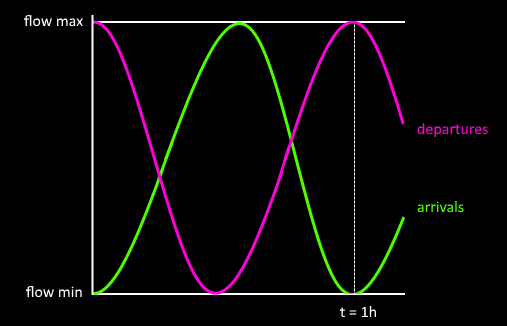
- In custom traffic mode, you can also switch to flow mode to set a constant flow of planes per hour from/to the main airport. For example, set it at 30 and you'll get 30 planes per hour to the main airport. If can also set a varying flow rate and set a minimum and maximum; the flow rate then varies between those two values, which results in alternating inbound and outbound peaks every hour. There are also options to play a game without departures, or without traffic to secondary airports. To increase the number of active runways, go to the 'runways' menu.

Flow varies when a minimum and maximum value is set. - You can score goals by landing a certain number of planes in a correct way, like 10 planes without separation incidents, or 5 planes without any mistakes (go around/divert/delay/missed approach/separation incident), or just land 100 planes in one game. However, to make it not too easy, you cannot use custom traffic mode if you want to score goals/set high scores. If you've used custom traffic mode, you have to start a new game first. In the full version, click on the currently selected airport to restart with a new game. Or just click 'new game' in the traffic menu.
- To pause, press ESC or, on android, the back button.
- The game is automatically saved when you exit or pause the game. Next time you start the app, the game will reload. Savegames on android are stored at /Android/data/com.dirgtrats.endlessatc/files/ (accessible via USB file transfer).
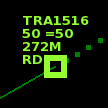 |
| Plane with destination 'RD' |
Game settings
Most settings in the menu speak for themselves. There are also some hidden settings available:
- Press and hold the menu button to speed up the sim to 20x speed.
- In the display menu, longpressing ‘line’ will toggle curved heading lines, and longpressing ‘ring’ doubles the ring size. Longpressing ‘dark’ toggles high contrast mode, and longpressing 'text' clears the pause screen history. To move the control bar to the bottom of the screen, longpress the 'bar' button.
- The following keyboard commands are available to further fine-tune settings: “DELAY0” (set pilot delay in seconds), “SWEEP000” (set radar update interval in tenths of seconds), “HLINE00” (set heading line length in tenths of minutes), “SPEED00” (set simulation speed factor), “NOBAR” (remove side bar), “CURSOR” (draws bigger cursor on screen), “TIMELAPSE00” (saves images every x seconds into /img folder), “CLEARTRACKS” clears the pause screen history. If your device does not have a keyboard, you can press and hold the 'lock' button in the display menu to popup the software keyboard.
- The full version also has multiple airports to choose from, with altitude restrictions, and optional weather (wind, clouds, air pressure) and radar delay settings. You can even add your own airport files.
Frequently asked questions
Q: Runways 18C and 18R are too close to each other. How do I make good use of them without getting incidents?
A: The approaches can be done completely independent; the trick is to intercept the localizers at different altitudes and at a large distance from the field. Read instructions above for more detail.
Q: It gets way too busy, what can I do?
A: Enable 'custom' mode in the traffic menu. You can limit the amount of planes you have to control to a certain number, or set the number of planes per hour you want to handle.
Q: Could you add my favourite airport?
A: Perhaps more airports will be added in the future. But in the full version, it's now possible to create an airport yourself, by editing a text file. More info here.


